How to Replace Garage Door Cables Safely
- Commercial Garage Door Repair
- Garage Door Opener Installation
- Garage Door Spring Repair
- Same Day Garage Door Repair
- Custom Garage Door
- Garage Door Opener Repair
- Garage Door Track Repair
- Gate Repair
- Garage Door Cable Repair
- Garage Door Panel Repair
- Local Garage Door Repair
- Garage Door Replacement
- Noisy Garage Door Fix
- Garage Door Installation
- Garage Door Section Replacement
- Overhead Garage Door Repair
How to Replace Garage Door Cables Safely
A malfunctioning garage door can disrupt your day, and often, the culprit is worn or broken garage door cables. These cables play a vital role in lifting and lowering your garage door safely. Whether it’s repair or replacement, addressing cables promptly should be a priority. If you’re facing issues with them, replacing or repairing cables safely is crucial. But before picking up your tools, it’s important to know the steps and safety measures involved.
This guide will walk you through the essentials of garage door cable repair and replacement, helping you handle it effectively or know when to call in a professional.
Why Garage Door Cables Matter
Cables work in tandem with the springs to ensure smooth operation of the door. They counterbalance the weight of the door, making lifting and lowering it manageable. Over time, these cables can fray, rust, or snap, leading to potential safety risks and operational failure.
Ignoring this repair could leave you with a door that won’t open, damage to other components, or a hazardous situation.
Step-by-Step Guide to Replacing Cables
Replacing garage door cables isn’t a job to take lightly. It involves dealing with heavy components and high tension, so it’s crucial to follow these three steps carefully.
1. Gather All the Necessary Tools
Before starting, ensure you have all the proper tools and safety gear ready. You will need:
- Replacement cables
- A sturdy step ladder
- Safety gloves and goggles
- Locking pliers and wrenches
- A winding bar
Safety first! Always wear gloves and goggles to protect yourself from sharp edges or unexpected tension releases.
2. Release the Door Tension
Garage door torsion springs are under extreme tension, so relieving this tension before working with cables is a must. Here’s how:
- Close the garage door completely to prevent unexpected movement.
- Use locking pliers to secure the door and prevent it from lifting.
- Insert a winding bar into the winding cone of the torsion spring and carefully reduce the spring’s tension step by step.
Approach this phase with caution. If you’re unsure, it’s best to contact a professional to avoid injury.
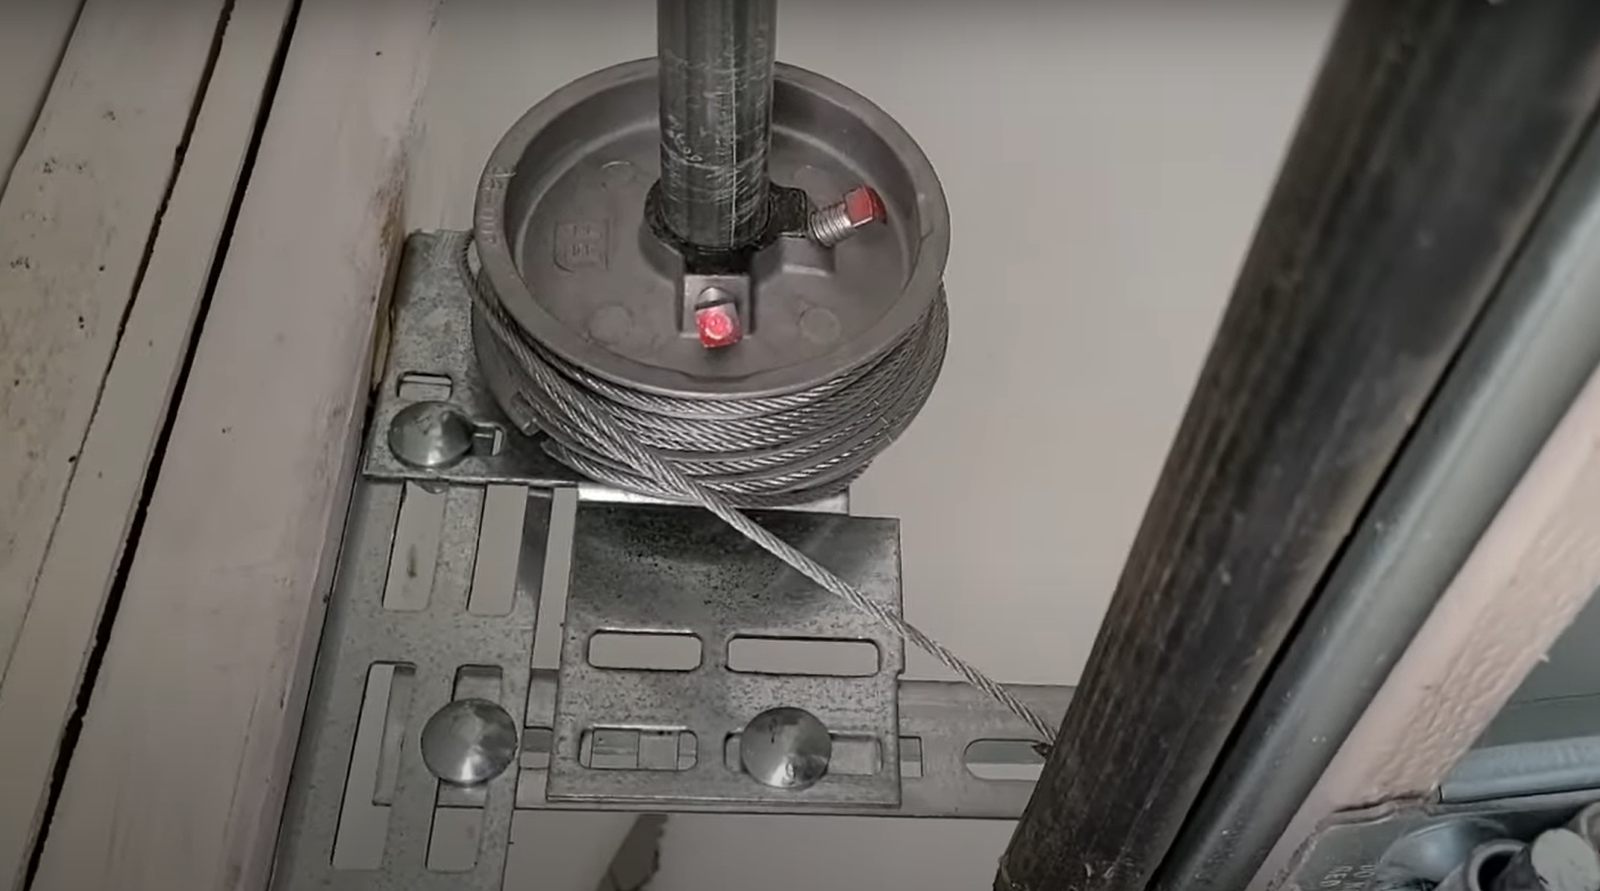
3. Remove and Replace the Cables
After you’ve relieved the tension, follow these steps to replace the cables:
- Detach the old cables from the drum and bottom brackets.
- Inspect the rollers, brackets, and drums for wear or damage, replacing any parts as needed.
- Attach the new cables securely to the bottom brackets and drum before tightening them.
- Reapply tension to the springs and test the door’s operation. Ensure it lifts and lowers smoothly without misalignment.
Remember, checking the cable alignment and tension is vital. Loose or overly tight cables can result in malfunctions or damage.
When to Call a Professional
If these steps seem overwhelming or the tension springs make you uneasy, don’t hesitate to seek help. Replacing cables involves handling components under significant pressure, which can lead to injury if not done correctly.
Luckily, Garage Door Repair Holmes Beach specializes in garage door cable repairs and replacements. Their team of professionals ensures your garage door is fixed safely and efficiently.
Trust the Experts at Garage Door Repair Holmes Beach
If you’re facing trouble with your cables, it’s always safer to rely on experts. Reach out to Garage Door Repair Holmes Beach to ensure your repairs are handled with care, precision, and expertise. Properly functioning garage door cables are key to your safety and peace of mind.